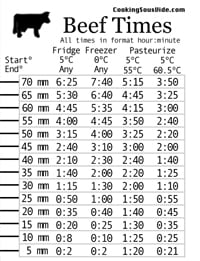
Sous Vide Thickness Ruler
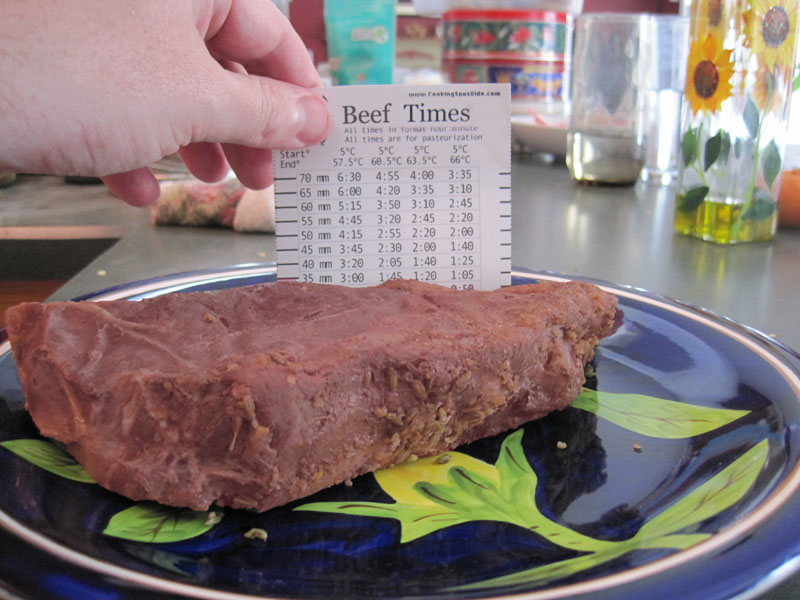
When cooking with sous vide, many people like to cook by thickness. When doing this, there's a lot of information to keep track of. To help out, I've made my own version of a printable sous vide thickness ruler.
I provide 3 different rulers with times for sous vide beef, chicken, and fish. The sous vide beef ruler has times for heating frozen and thawed beef and pasteurizing it at both 55°C and 60.5°C. The sous vide chicken has times for pasteurizing chicken at 57.5°C, 60.5°C, 63.5°C, and 66°C. The sous vide fish ruler has times for heating fatty fish, and pasteurizing both lean and fatty fish at 55°C and 60.5°C.
To get the ruler you just have to sign up for my free Exploring Sous Vide email course or my free newsletter to get access to my printable ruler. My best selling book Modernist Cooking Made Easy Sous Vide also has these charts in them, as well as tenderness-based sous vide times for more than a hundred cuts.
For more information about sous vide thickness times including where they came from and what they mean you can check out my article on sous vide cooking times by thickness.
Related Amazing Food Made Easy Articles
All tags for this article:
 This article is by me, Jason Logsdon. I'm an adventurous home cook and professional blogger who loves to try new things, especially when it comes to cooking. I've explored everything from sous vide and whipping siphons to pressure cookers and blow torches; created foams, gels and spheres; made barrel aged cocktails and brewed beer. I have also written 10 cookbooks on modernist cooking and sous vide and I run the AmazingFoodMadeEasy.com website.
Affiliate Disclaimer: Some links on this site might be affiliate links that if used to purchased products I might receive money. I like money but I will not endorse something I don't believe in. Please feel free to directly go to any products I link to and bypass the referral link if you feel uncomfortable with me receiving funds.
If so, please join the more than 19,000 people who receive my exclusive newsletter and get a FREE COPY of my printable modernist ingredient cheatsheet.
Just click on the green button below!
Get Started!
Thanks for signing up! I look forward to sending you recipes, links, and exclusive content and offers that you can't find anywhere else on the site, and I'll send you a free copy of my modernist ingredient cheatsheet too!
Enter your first name and email below, and I'll see you on the inside!
Thanks for signing up! I look forward to guiding you through the process of discovering sous vide with amazing articles, recipes, and tips and tricks you can use to impress your friends and family by turning out amazing food time and time again!
Enter your first name and email below, and I'll see you on the inside!


